DP-008EX APPLICATIONS
The demo song stored on the DP-006 and DP-008EX recorders was produced using only a DP-006. We will describe how this song was created as an example of how to use these units.
One of the greatest strengths of the DP-006 and DP-008EX is that, compared to using a computer, you can easily use their built-in microphones to start recording quickly. By using their other functions, though, you can also make recordings that are even better, as we describe below.
We used a DP-006 because everything done in the production of this song was possible using this unit. Of course, a DP-008EX could also be used for the same type of work.
(Since the DP-008EX does not have stereo tracks, however, the handling of stereo tracks would be different from the DP-006.)
We decided on the following track assignments (which parts would be on which tracks) and recorded accordingly.
TRACK1:Lead guitar (with harmony parts overdubbed in some places)
TRACK2:Bass guitar
TRACK3:Acoustic guitar (with panning for rhythm parts and riffs)
TRACK4:Drums (stereo)
Flow
| Recording drums | To TOP |
We recorded this demo one step at a time, starting with the drums.
To match the atmosphere of the song, we wanted drums suitable for acoustic performances rather than a rock kit. After discussing it with the drummer, he brought a YAMAHA Hip-gig set, which is an all-in-one portable drum kit. Since this song has many parts with only cymbals, we had the drums set up with Zildjian A Custom cymbals, which have a fine sound and good tone even at low volumes.
Since we recorded only with the built-in mics, we captured the sound of the drums with just a stereo recording. Although it is possible to use multiple mics, choosing and placing them and adjusting input settings and applying dynamics effects for different drum sounds, this time we set out to achieve the desired sound just through mic placement.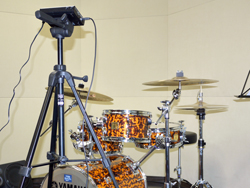
Note:The DP-006 and the DP-008EX are cannot record by multiple microphone, because these models has only 2 mic inputs.
At any rate, we tried recording to get an idea of the sound characteristics, the feel and tone quality. Since the sound heard by the ear differs from recorded sound, the goal of the first recordings was to capture a sound close to what we heard. We found a place where the balance sounded good to the ear and set up the DP-006 there. We made use of its tripod mounting threads during mic placement.
Here is how the setup looked from a different angle. The mic is pointed just a little above the snare.
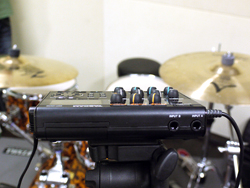
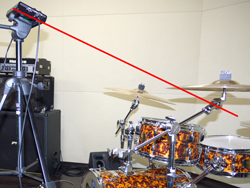
We recorded the drums to TRACK 4, which is a stereo track.
To set the inputs, we just pressed the INPUT SETTING button and set both IN A and IN B to INT.MIC (internal mic). We set the MODE to STEREO to record a stereo track.
We set the recording level so that at the loudest point, it was 70-80% of the maximum.
After recording, we played it back to check the feel of the recorded sound.
After the first placement of the DP-006 mics, even though the balance was good, we found that the volume of the bass drum was lacking.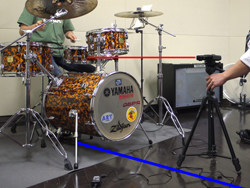
Considering this, we lowered the DP-006 to increase the recorded volume of the bass drum.
The reason that we placed it a little to the right was to locate the snare sound in the center. Compared to the bass drum with its low frequencies, the snare drum with a lot of high frequencies is easier to locate in the stereo field, so we were able to place the snare in the center of the recording by placing the mics to the right.
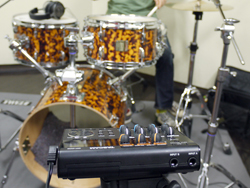 We adjusted the mic placement and recorded and played the results back several times until we got the recorded sound we wanted. Of course, it was difficult balancing the volume of the bass drum with the snare, cymbals and the rest of the kit. We also tuned the drums.
The photograph to the left shows our third placement. We tried removing the front-end of the bass drum to get a tighter sound. In the end, however, we put the front head back on and the drummer used a muting technique to adjust the sound.
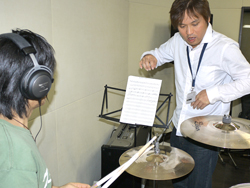
While we were adjusting the miking, the arranger and the drummer discussed performance instructions and nuances, for example.
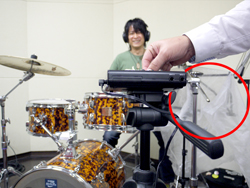 Through this process of trial and error, we finally arrived at this placement.
We placed the DP-006 at a height that was about halfway between the original placement and the one shown above. You can see that the recorder is just about level.
Since the mics are omnidirectional, a sense of direction is not as clear as with directional mics. They are not exposed, however, so changing their orientation does change their total quality some. In addition, the distance can also be adjusted by changing the angle of the recorder.
The white cloth at the right side of the photograph is a fabric like that used in CD-R cases. We draped it over a music stand in front of the hi-hat to soften the tone of the hi-hat and reduce its volume. We placed the cloth like this because we were unable to control the volume of the hi-hat just with mic placement. This is not something we prepared in advance. We just used material that we found in the studio. When you are recording with limitations in a restricted environment, this kind of improvisation is important.
After recording the drums, we moved on to recording the bass.
| Recording bass | To TOP |
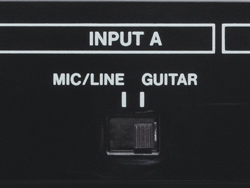 We used a line input to record the bass guitar. Since a bass or guitar can be input directly through INPUT A, we just set the switch on the left side of the unit to GUITAR and plugged the bass in to record. We recorded to TRACK 2 while listening to the drums recorded in stereo on TRACK 4.
| Recording Acoustic guitar | To TOP |
Next, we recorded a total of four tracks of acoustic guitar. Before recording, we exported the recorded bass on track 2 and imported it back to track 3. Then, we used the open TRACK 1 and TRACK 2 to record the backing guitar and some riffs.
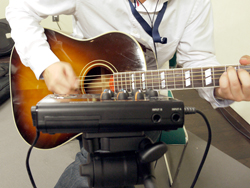 We also recorded the acoustic guitar with the built-in microphones. Even though we could have recorded the acoustic guitar in stereo, we chose mono recording because with a total of 4 guitar tracks, we thought it would have plenty of weight in the mix.。
We used MIC A to record. We set it up as shown in the photograph with the mic aimed at the neck end of the sound hole. The reason that we angled it little bit toward the first string was to balance the volume of the strings.
With the DP-006, MIC A is automatically assigned to INPUT A, but you can change the setting to record this input on any track. So, we assigned IN A (INPUT A) to both tracks 1 and 2 and recorded two guitar parts using the same setting.
Of course, we determined the placement through trial and error as we had done with the drums.
After recording, we bounced the backing track and riff recordings to TRACK 3. (The bass part was recorded on TRACK 3, but we overwrote it at this time because we had already backed it up by exporting it.)
After adjusting the volume and panning of these two guitar parts, we set the REC MODE to BOUNCE, and pressed the REC button on TRACK 3 to light it. Then, we pressed the REC and PLAY buttons to start bouncing the two guitar tracks to TRACK 3.
At this point, we had completed the two guitar parts on TRACK 3 and the drums on TRACK 4. Next, we moved on to recording the main melody. We imported the bass track that we had exported earlier again and recorded the main guitar part on TRACK 1.
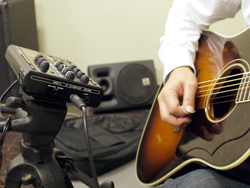 After the backing parts, we continued to use MIC A for recording, but we adjusted the position slightly, bringing the mic about 2 inches (5 cm) closer to record this part. By doing this, we captured a sound that was more forward, so this guitar part was automatically more prominent than the backing parts. During this recording, there was no mixing and the adjustments we could make were limited, so we made adjustments to the distances of the instruments and for certain parts through mic placement like this.
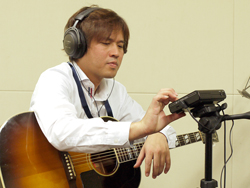 Another thing is that the arranger played the acoustic guitar parts himself. After we positioned the mic, he handled the recording as he played.
This kind of thing is easy since the operation is simple and it can all be done with just this recorder. He could record and play back as many times as he wanted with ease.
We also recorded a harmony part. Since we had already filled all the tracks, we deleted the bass, which we had already backed up, from TRACK 2 and used that track for this recording. Usually, it would be good to hear the bass too, but given the character of the harmony part, we recorded it right on TRACK 2 while the feeling was still right.
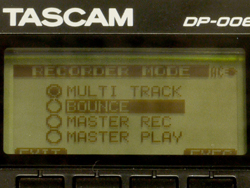 After he was done recording the guitar parts, we combined TRACK 1 and TRACK 2 into one track. We bounced them in the same way as before, setting the REC MODE to BOUNCE and bouncing TRACK 1 and TRACK 2 to TRACK 1. Unlike when using a cassette-based multitrack recorder, with the DP-006 bouncing is possible even when all the tracks are full, of course.
In order to keep operation simple and enable speedy operation, the DP-006 and DP-008EX do not have virtual tracks. When necessary, however, the same kind of effect can be achieved by utilizing the file export function.
You can save that takes that you want to keep by exporting them after recording. From the menu, select IMPORT/EXPORT and then EXPORT TRACK to export any track you want. Since you can also change the file name at this time, it is a good idea to give tracks names that are easy to remember.
| In the last | To TOP |
The goal of recording this demo song was for playback on the DP-006, so this was the end of our work. Please listen to this song on a DP-006 or DP-008EX. Anyone can also easily use the dedicated level and pan knobs on these models to mix the tracks. Please give it a try at a musical instrument store.
On the DP-008EX, we saved the main guitar harmony part on its own track without bouncing and added a tambourine part to the demo song. The tambourine, however, was also recorded using a DP-006.
Not only can you convert your completed recordings into a two-track (stereo) recording, you can also save each of the tracks individually. The files are WAV format, so you can import them into most DAW software and use them as is.
In a DAW, you can do more complex editing and apply plug-ins to the files as you mix, for example. We hope that you will use the DP-006 and DP-008EX multitrack recorders as sketchpads for music creation.
Production Members
Producer: Yasushi Kato
Composer: Yosuke Matsuno
Arranger: Yosuke Matsuno
Drums: Ryo Fujisaki(with YAMAHA Hip-gig/Zildjian A custom)
Bass guitar/Acoustic guitar: Yosuke Matsuno(with Gibson Southern Jumbo)
Sound Coordinator: Takahiro"koita"Koizumi
| Production cooperation | |
| Drums | Ryo Fujisaki |
| HP | http://downupbeat.com/ryo/ |
