GIGAPULSE VST APPLICATIONS

by Jon Fairhurst, Poorly Projected Pictures
Introduction
Ever since Audio Fidelity released the first commercial stereo disc in 1958, listeners have been able to enjoy not only the sounds of a musical performance, but also its "space". Intuition would tell you that two speakers would reproduce sounds only on a thin line between the drivers. In reality, a well-engineered two channel recording can present an entire soundstage to the listener.
The soundstage consists of three dimensions: left to right, front to back and top to bottom. Not only can an instrument can be presented at any point in the soundstage, an instrument can have "breadth". Play a piano and pay attention to its sound. It doesn't come from a point. A piano has breadth. Want something bigger? Try a pipe organ or string orchestra.
The room or concert hall adds yet another aspect - space. It can be small or large, live (reflective) or dead (absorbing). It can be simple, like a sewer pipe, or complex, like a cathedral. It's primarily the room or hall that gives the soundstage its vertical dimension.
The challenge then is to take a sampled or synthesized instrument and give it position, breadth and space. The idea isn't just to deliver a sound, but to deliver the illusion of the soundstage.
Creating a Soundstage
GigaPulse is a signal processing engine that can be used to create a soundstage. There are two versions. GigaPulse Pro, which gives you the freedom to create complex, custom soundstages, and GigaPulse SP, which runs impulses that are bundled with sample libraries. This tutorial is for setting up a soundstage in GS3 Orchestra, which includes GigaPulse Pro as a standard feature.
A quick glance at the GigaPulse Pro user interface reveals a stage with up to seven microphones and up to eighteen "seats", depending on the room or effect that you have selected. In theory you could playback eighteen different sampled, solo instruments, each from it's own seat. By enabling every microphone, you could mix the result into a 7.1 multi-channel recording. If you were to choose the "Media Ventures Live Room", your final product will sound as if you sat a live chamber orchestra in a top LA studio - all on a budget of a few hundred bucks.
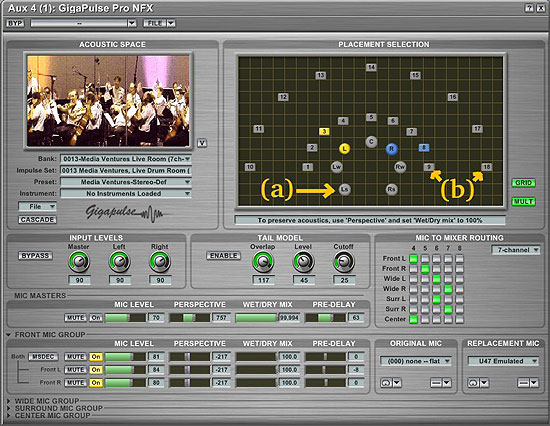
Figure 1: The GigaPulse user interface with seven (a) mics and eighteen (b) seats.
GigaPulse creates its magic through convolution. The Media Ventures Live Room was sampled to create an impulse signature for every combination of seat and mic position. By "convolving" your sound waves with these impulses you are effectively splattering your sound all over the walls of the sampled room. And the result sounds great.
The thing is, convolution takes a lot of processing. GigaPulse was built with elegant programming and a few signal processing tricks to do its job efficiently, but there's no avoiding it: convolution chews up some serious CPU cycles.
So, what if you were to create the Media Ventures Live room project above, enabling all seven mics and using all eighteen seats? It would require 126 convolutions (7 mics x 18 seats). You'd need a stable of computers to do that in real time. Fortunately, we can get a similar result with a lot less horsepower.
Getting the most out of GigaPulse
It's ridiculously easy to get a huge soundstage using GigaPulse - just open a GigaPulse instance and choose a huge room. My preference, for orchestral work, is the "Medium Hall". Not huge enough for you? Then choose the Large Hall. You can even push the walls out a bit further by turning up the perspective control. For this tutorial, we'll stick with the Medium Hall.
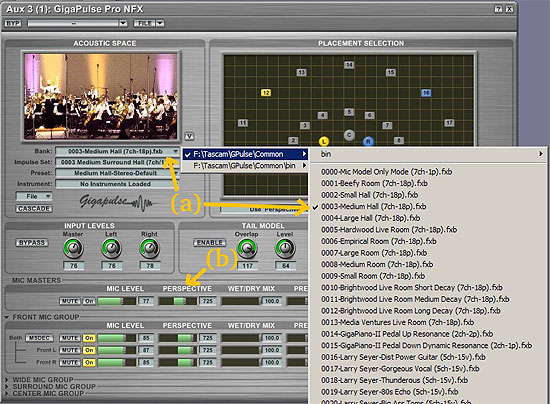
Figure 2: (a) selecting a room or effect, (b) the perspective control.
So, we have huge. What about efficient? There are three tricks that I use. The first is to go with only three levels of depth: near, medium and far. The second trick is to use stereo convolution, allowing us to pan our instruments from left seat to right seat. The third trick, for GS3 users, is to use the signal routing of the DSP station to allow each instrument to be placed anywhere in this two dimensional space. This only requires three stereo convolutions - six total - to achieve our effect. At idle this consumes 38% of my AMD Athlon64 3000+ (1.8 GHz) processor. In other words, I can run in all in real time on a single, modest PC.
GigaPulse and the DSP Station
GS3 plays its samples in the MIDI Mixer. Before the sound gets to your soundcard, Giga passes all of these sounds through the DSP Station. That's where we create our soundstage.
The DSP station has four sections: the Inputs, Groups, Aux Returns and Output Masters. You can think of this as a big funnel with your sounds through the Inputs, Groups, and Output Masters, and then to the soundcard.
But what about the Aux Returns? Aux Returns are like baseball's utility infielders. They can play just about anywhere. To keep it simple, I use them within the Groups. Here's the routing that I use:
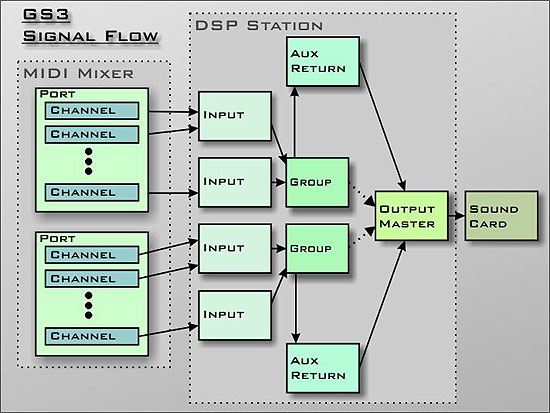
Figure 3: GS3 Signal Flow. The DSP Station acts like a funnel. For this tutorial, I force the signal through the Aux Returns.
Setting up your Soundstage
Output Masters
Let's work our way backwards through the signal flow, starting with the Output Master. First, open the DSP Station view by pressing "Ctrl+D", then open the "Output Masters" view by clicking on its tab. You can also cycle through the DSP tabs by pressing "Ctrl+Tab".
For this example let's work in stereo, so we only use the Master for the main stereo output. Here's a tip: as long as we're here, enable the 'REC" button, so we are prepared to record the final mix. I prefer to leave the volume slider at maximum. To keep things organized, give the output a custom name.
* Note: To enter a custom name, click the name window, type the name, and press "Enter". If you click away before pressing "Enter", Giga will not display your custom name.
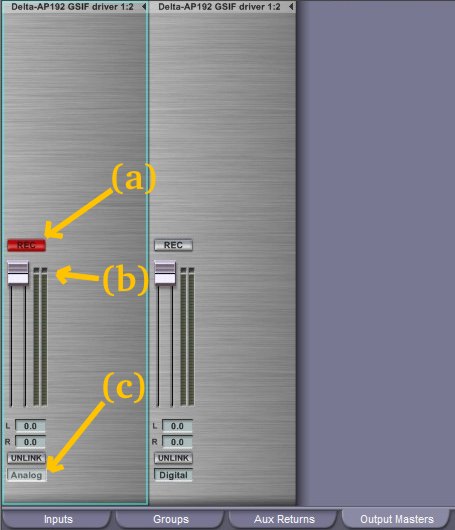
Figure 4: Output Masters. (a) enable the "REC" button, so you will be ready to capture the result; (b) I prefer to leave the gain at maximum; (c) you can name the output master. I chose the names "Analog" and "Digital".
Aux ReturnsNext, let's work with the Aux Returns. (Press "Ctrl+Tab" three times.) Our goal is to setup three Aux Busses. We will name these "near", "mid" and "far". Each will host one GigaPulse instance.The first step is to choose an Aux Bus and insert one GigaPulse instance. We then name the bus, and set its gain. Do this for the three Aux Busses. We'll customize the GigaPulse settings in the next section. You can view the GigaPulse panels at any time by clicking the "EDIT" button. The "INS" buttons lets you enable and disable the individual Aux Busses. Make sure that the "INS" buttons are enabled, so the signal passes through the GigaPulse instances. By disabling an "INS" button the signal will bypass the effect, and turn off the processing, giving your CPU a break. |
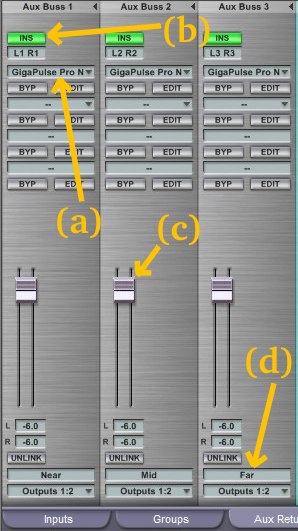 |
| Figure 5: Aux Returns. (a) insert a GigaPulse instance here; (b) enable or disable the effect with the "INS" button; (c) leave the gain at -6.0; (d) I named these "Near", "Mid" and "Far". | |
GigaPulse
For each of the three Aux Returns we have one GigaPulse instance. Click the Aux Bus "EDIT" button to launch its user interface.
In most cases you will want all of your instances to use the same impulse set. I've chosen the Medium Hall across the board. For the near setting I chose seats 2 and 6, mid is 4 and 6, and far is 13 and 15. I left the perspective settings at default, though these can be adjusted to taste. Make sure that the wet/mix is 100% wet. For GigaPulse soundstages, we don't want any dry signal coming through the mix.
Note that the left-front mic and chair 2 are both yellow and the right-front mic and chair 8 are both blue in the "near" case. This is a stereo setup.
How to create a stereo setup in GigaPulse:
- Click seat 2. It should now be yellow.
- Click the left-front mic. It should also become yellow.
- Now, here's the trick: hold the CTRL key while clicking the right-front mic. It will get a "two dot" label.
- Release the CTRL key and click seat 8. Seat 8 and the right-front mic will both become blue.
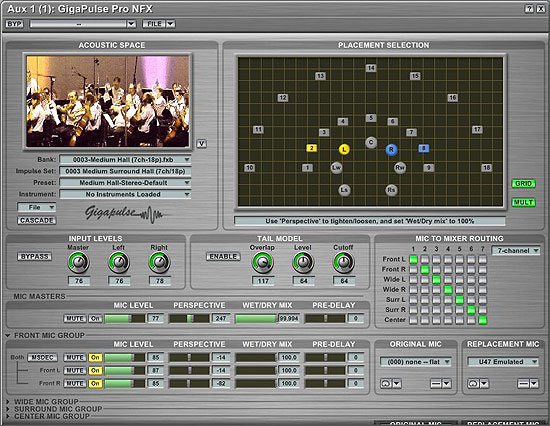
Figure 6: GigaPulse "near" settings.
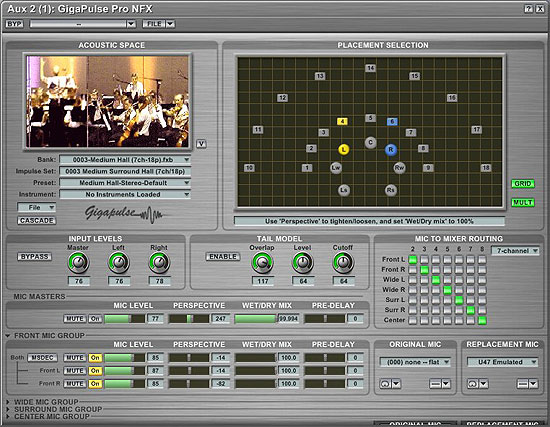
Figure 7: GigaPulse "mid" settings.
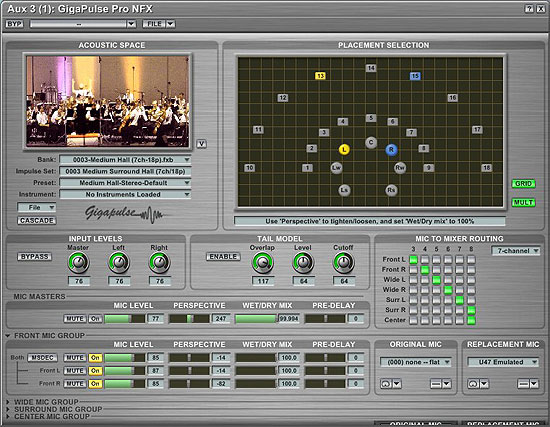
Figure 8: GigaPulse "far" settings.
Keep in mind that these are just some of the possible choices you might make for setting up GigaPulse. Try different rooms and perspective settings to create your own soundstage.
Groups
To view the Groups tab, press "Ctrl+Tab" three times.
I use groups to send the signals to the Aux Busses. The trick is to set each Aux Send to be in the "Pre" configuration, and to set the gain of the Groups to zero. This ensures that the signal is 100% wet.
In the basic setup I use three groups; one each for near, mid and far. You could also make groups that mix near and mid, mid and far, or any other mix of aux busses.
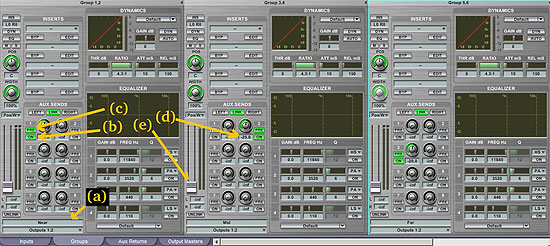
Figure 9: DSP Groups. (a) name these "Near", "Mid" and "Far"; (b) enable AUX 1 on the first group, AUX 2 on the second and AUX 3 on the third; (c) set the Aux Sends in "PRE" mode, d) set the Aux Send gains to about -20.0 dB for each Aux Return; (e) set the group gains at -Inf to ensure that no dry signal passes to the outputs.
Inputs
Now the fun begins. First, press "Ctrl+Tab" three times to select the Input view. We can create inputs for every instrument or section. Here we choose the depth of the instrument, as well as its left-right position and its breadth. To set the depth, simply select the desired group. To set the left-right position set the "POS" control. To set the breadth, set the "WIDTH" control. By the way, it's especially important that you name the Input channel strips. It will simplify the setup of the MIDI channels.
As an example, take a look at Input 1,2. I've set it up for the 1st Violins, I've chosen the "near" group, panned towards the left, and set the width control to allow some breadth. The second violins are have similar panning, but use the "mid" group to push them further back on the stage.
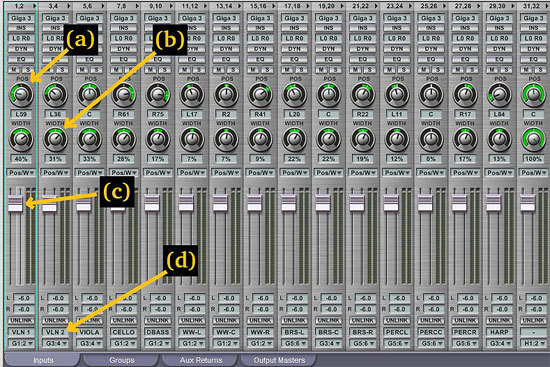
Figure 10: DSP Inputs. (a) use the "POS" control to position the instrument or section from left to right; (b) set the width control wider for sections, narrower for solo instruments (c) set the default mix levels here; (d) name each input for a specific instrument or section.
MIDI Mixer
We've made it through the DSP Station. Press "Ctrl+M" to set up our instruments in the MIDI Mixer.
Here you load your instruments into the channels as usual. To place that channel into your soundstage, simply direct the channel's output to the desired DSP Input. Since we've already set the DSP Input names based on instruments and sections, the choices should be fairly obvious. Note that the first two channels represent the first violins. These route to input VLN1. The next two channels are for the second violins, and they route to VLN2.
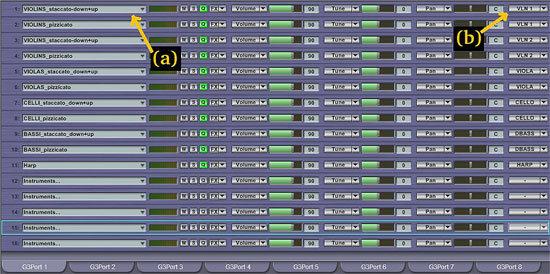
Figure 11: The MIDI Mixer showing the Channels on Port 1. (a) load the instruments into the channels; (b) route each channel to its appropriate DSP Input. Note that our custom names show up here.
That's it! Play an instrument and you should hear it from within the soundstage. You can fine tune the position, breadth and depth of each instrument by adjusting the controls that we set in the DSP Station Inputs, groups and GigaPulse instances.
The Demo
I've created a short demo that uses the soundstage we created above. I was able to render the entire demo in a single pass on a 1.8 GHz Athlon64 system with 1 GB of RAM. The CPU idled at 38% and peaked at 52%. I used Sonar 3 SE as the sequencer, running it on the same machine as GS3. All of the instruments used are part of the Vienna Giga Symphony library that is included with GS3 Orchestra. In general, I stuck with the staccato and pizzicato samples, since short notes accentuate the soundstage.
Here's another tip for giving your instruments space: play each line in by hand. And don't copy MIDI tracks from one channel to another. If the note on and off times between different instruments vary, you'll hear separate instruments. If the attacks always line up, you'll tend to hear a single instrument with interesting color. For this demo I played everything in by hand. I didn't so much as open the piano roll. If I didn't like a given note, I just recorded another take.
Regarding processing, I only used the processing describe above. There's no EQ or compression involved. I just tweaked the levels, captured to wave, normalized and encoded as an MP3.
I've rendered both the processed and dry versions of the demo. After hearing the instruments in their places, I find the flat sound of the dry version to be almost comical.
Conclusion
GigaPulse can be used to create realistic soundstages that provide a three dimensional reality to your compositions. By using the steps above you can create a reusable template for placing your instruments anywhere on the stage. This technique is efficient enough to be run in real time on a single, modest computer.
About the author
Jon Fairhurst graduated from UCSB with an emphasis in signal processing, and has worked for more than 25 years in the high tech industry. Recently, he co-founded Poorly Projected Pictures with his son, where Jon composes the music for Colonel Crush Films - OF ACTION!
